优势
- vue 2、3 都支持。
- 抛弃传统的
Mutation,只有state、getter和action,简化了代码结构。 - 不需要嵌套模块,符合 Composition API 代码风格。
- 支持 TS。
- 代码简洁。
安装
初始化项目: npm init vite@latest。
安装 Pinia : npm i pinia。
创建 Store
// src/store/index.ts

import { createPinia } from 'pinia'

const store = createPinia()
export default store
在 main.ts 中引入并使用:
// src/main.ts

import { createApp } from 'vue'
import App from './App.vue'
import store from './store'

const app = createApp(App)
app.use(store)
State
定义 state:
import { defineStore } from 'pinia'

export const useMainStore = defineStore('mainStore', {
  state: () => ({
    msg: 'Hello World!',
  }),
  getters: {},
  actions: {},
})
获取 state:
<template>
  <div>{{ store.msg }}</div>
</template>
<script lang="ts" setup>
  import { useMainStore } from '../../store'
  const store = useMainStore()
</script>
也可以结合 computed:
const msg = computed(() => store.msg)解构 state
需要同时获取 Store 中的多个值时,通常会使用解构赋值的方式。但在 Pinia 中直接解构会造成数据失去响应性:
<template>
    <div>{{ msg }}--{{ store.msg }}</div>
</template>
<script lang="ts" setup>
	import { useMainStore } from '../../store';
	const store = useMainStore();
	const { msg } = store;
	setTimeout(() => {
	    console.log("patch");
	    store.$patch({ msg: 'change' });
	}, 2000);
</script
storeToRefs 结构方法:
import { storeToRefs } from 'pinia'
const { msg } = storeToRefs(store)
修改 state
直接通过 store.属性名 来修改。
store.count = 100多条数据修改:
「不建议」多条数据的修改也可以直接通过
store.属性名来修改:const change = () => { store.obj = { a: 8, b: 7, c: 9 } }使用
$patch来修改数据:// $patch 对象 store.$patch({ count: store.count + 2, msg: 'This is Pinia World', }) // or // $patch 函数 store.$patch((state) => { state.arrs.push({ name: 'haha', age: 12 }) state.hasChange = true })通过
action修改:export const useMainStore = defineStore('mainStore', { state: () => ({ msg: 'Hello World!', }), getters: {}, actions: { changeMsg(newMsg) { this.msg = newMsg }, }, }) const store = useMainStore() store.changeMsg('哈哈哈')
Getters
等同于 store 的 state 的 计算值 。可以这样定义:
export const useMainStore = defineStore("mainStore", {
    state: () => ({
        msg: "Hello World!",
				users: [
            { id: 1, name: "aa" },
            { id: 2, name: "bb" },
            { id: 3, name: "cc" }
        ]
    }),
    getters: {
        myMsg(state) {
            return `${state.msg} === 111`;
        },
				// 访问其他 getter
        myMsg2(state): string {
            return `${this.getMsg} === 222`;
        },
				// 向 getter 传递参数
				getUserById: (state) => {
		      return (userId) => state.users.find((user) => user.id === userId)
		    },
    }
});

const store = useMainStore();
console.log(store.myMsg1);    // Hello World! === 111
console.log(store.myMsg2);    // Hello World! === 111 === 222
console.log(store.getUserById(2));    // { id: 2, name: "bb" }
向 getter 中传递参数的方法会让 getter 不再被缓存 ,不过我们可以手动做一下缓存:
export const useStore = defineStore('main', {
  getters: {
    getActiveUserById(state) {
      const activeUsers = state.users.filter((user) => user.active)
      return (userId) => activeUsers.find((user) => user.id === userId)
    },
  },
})
访问其他 store
export const useStore1 = defineStore('store1', () => {
  const store1Count = ref(2)
  return { store1Count }
})
export const useStore2 = defineStore('store2', {
  state: () => ({
    store2Count: 100,
  }),
  getters: {
    countTotal(state) {
      return useStore1().store1Count + state.store2Count
    },
  },
})

const store2 = useStore2()
console.log(store.countTotal) // 102
Actions
异步 action
export const useStore = defineStore('store', {
  actions: {
    async getData() {
      const response = await fetch('https://getman.cn/echo')
      const data = await response.text()
      return data
    },
  },
})
const store = useStore()
const data = await store.getData()
console.log(data)
action 相互调用
export const useUserStore = defineStore('store', {
  actions: {
    async login(account, pwd) {
      const { data } = await api.login(account, pwd)
      this.setData(data) // 调用另一个 action 的方法
      return data
    },
    setData(data) {
      console.log(data)
    },
  },
})
action 调用其他 store 的 action
同 getter;访问其他 store
数据持久化
插件 pinia-plugin-persist 可以辅助实现数据持久化功能。
安装
npm i pinia-plugin-persist --save使用
// src/store/index.ts

import { createPinia } from 'pinia'
import piniaPluginPersist from 'pinia-plugin-persist'

const store = createPinia()
store.use(piniaPluginPersist)

export default store
接着在对应的 store 里开启 persist 即可。
export const useUserStore = defineStore('user', {
  state: () => ({
    name: '张三',
  }),
  // 开启数据缓存
  persist: {
    enabled: true,
  },
})数据默认存在 sessionStorage 里,并且会以 store 的 id 作为 key。
自定义 key
你也可以在 strategies 里自定义 key 值,并将存放位置由 sessionStorage 改为 localStorage。
persist: {
		enabled: true,
	  strategies: [
		    {
			      key: 'my_user',
			      storage: localStorage,
		    }
	  ]
}持久化部分 state
默认所有 state 都会进行缓存,你可以通过 paths 指定要持久化的字段,其他的则不会进行持久化。
state: () => ({
		name: "张三",
    age: 18,
    gender: "男"
}),
persist: {
    enabled: true,
    strategies: [
        {
            storage: localStorage,
            paths: ["name", "age"]
        }
    ]
}
上面我们只持久化 name 和 age,并将其改为 localStorage, 而 gender 不会被持久化,如果其状态发生更改,页面刷新时将会丢失,重新回到初始状态,而 name 和 age 则不会。
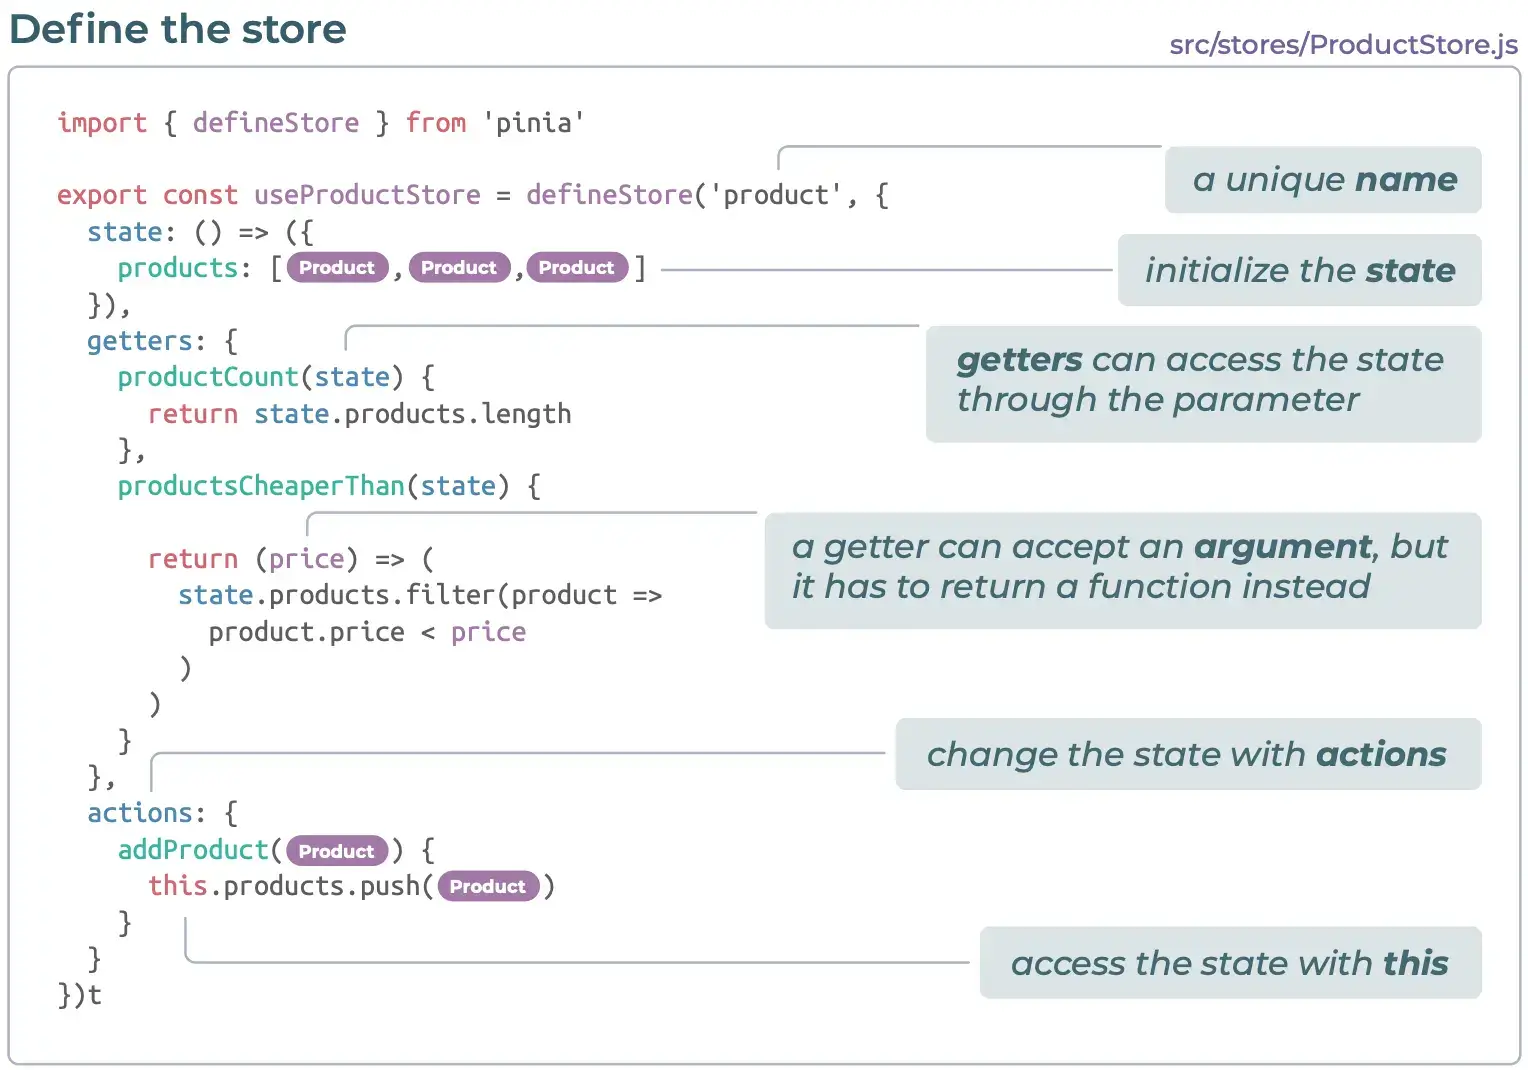
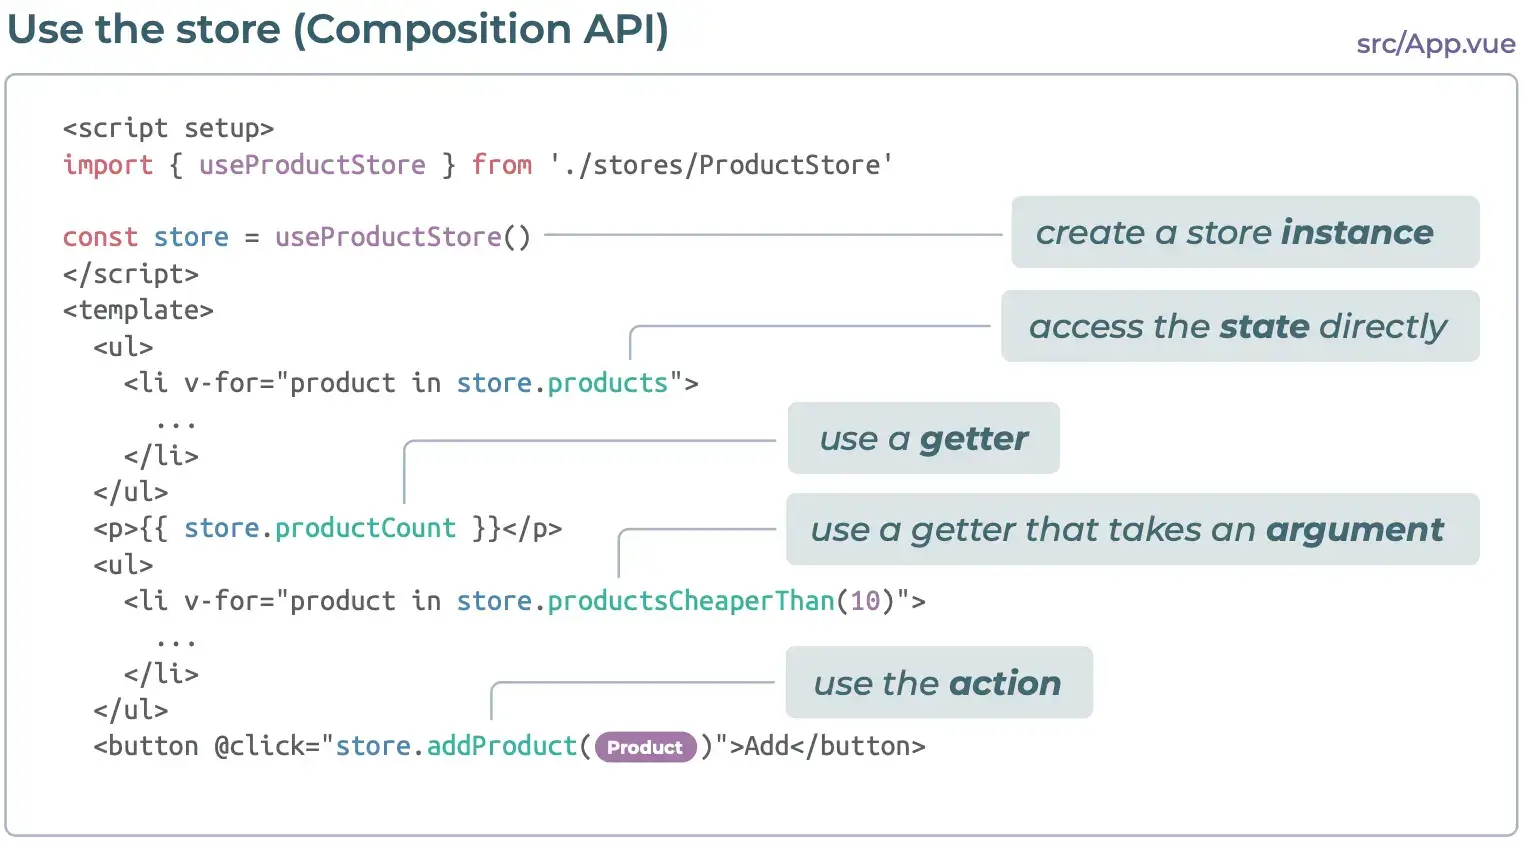
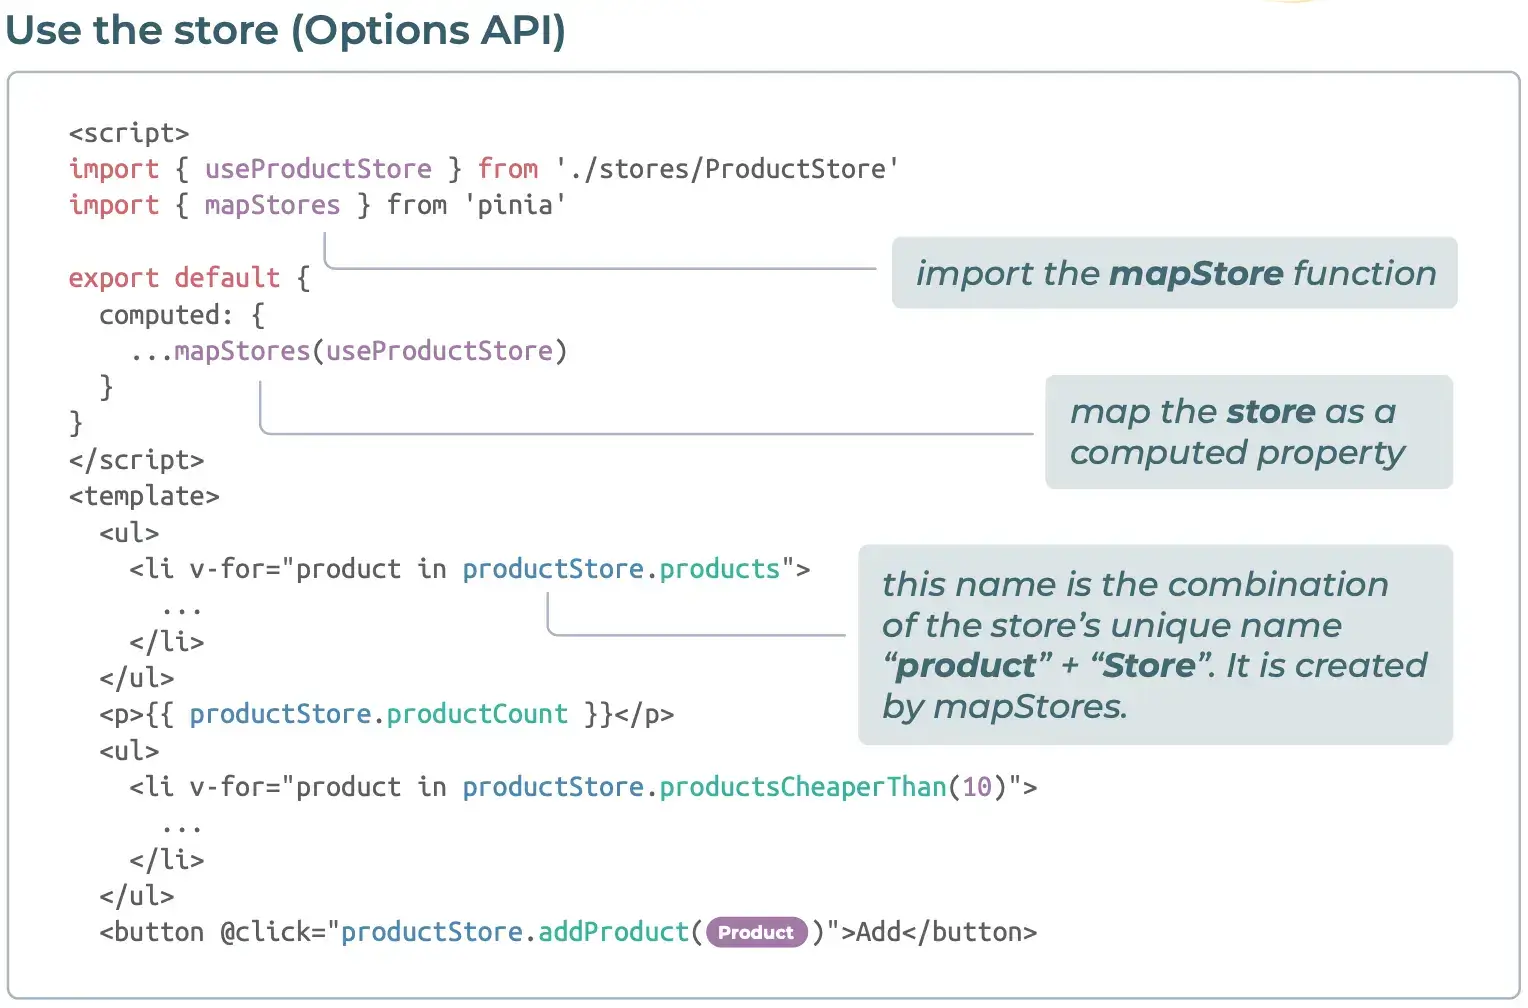
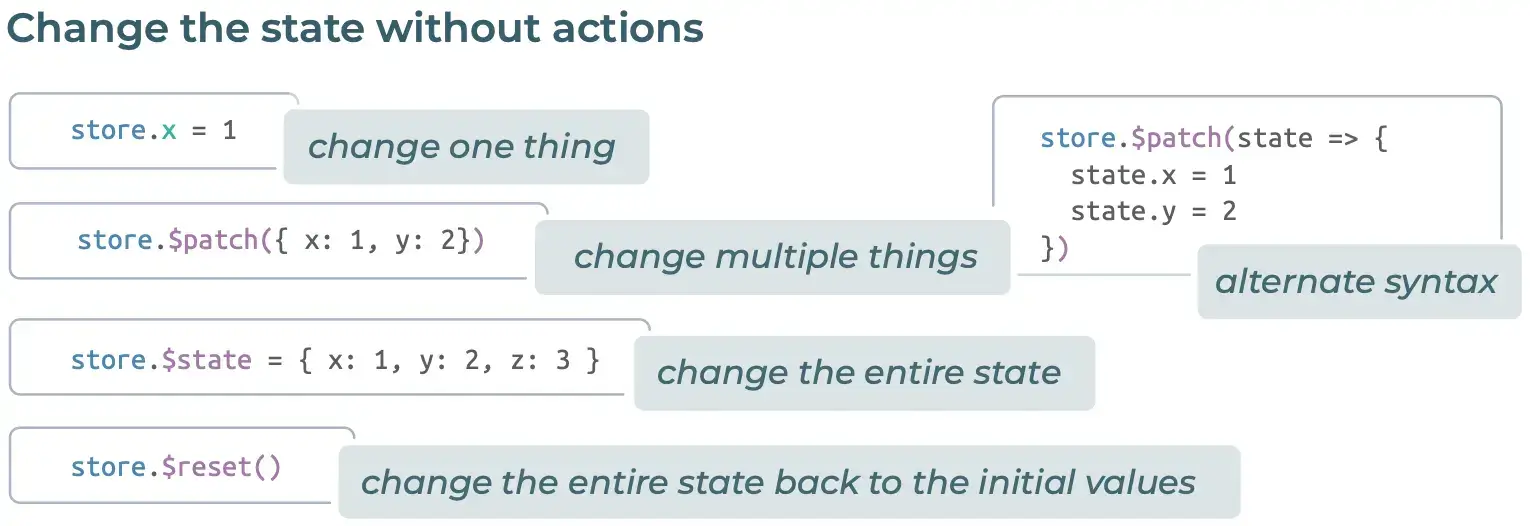
附:Pinia 速查表
1. 安装 Pinia

2. 定义 store

3. 使用 store (组合式 API)

4. 使用 store (选项式 API)

5. 修改 state

6. 订阅修改

← Previous postNest.js Typrorm 多对多关系如何创建
Next post →深入 Pinia:从代码出发探索 Vue 状态管理的奥秘

